n1cef1sh's Blog
Spring Security主要做两件事,一件是认证,一件是授权。
练习代码同步到github:SpringSecuritySamples/spring-security
基本配置
首先pox.xml引入依赖
        <dependency>
            <groupId>org.springframework.boot</groupId>
            <artifactId>spring-boot-starter-security</artifactId>
        </dependency>
编写配置类SecurityConfig,继承WebSecurityConfigurerAdapter。
新版本的Spring Security要求必须为用户配置提供编码器,因此首先提供一个PasswordEncoder 实例,暂时不对密码进行加密,返回NoOpPasswordEncoder 的实例即可。
    @Bean
    PasswordEncoder passwordEncoder(){
        return NoOpPasswordEncoder.getInstance();
    }
然后重写WebSecurityConfigurerAdapter里的Configure方法,这个地方配置类可以@Override三个配置方法
    @Override
    public void configure(AuthenticationManagerBuilder auth) throws Exception {
        //用来处理身份认证
    }
    @Override
    public void configure(HttpSecurity http) throws Exception {
        //用来建造安全过滤器SecurityFilterChain
    }
    @Override
    public void configure(WebSecurity web) throws Exception {
        //用来创建SecurityFilterChain中的核心过滤器FilterChainProxy
    }
首先重写configure(AuthenticationManagerBuilder auth)。
因为还没有配置数据库,所以暂时在内存中配置测试用户数据。Spring Security 支持多种数据源,不同来源的数据最后都被封装成UserDetailService接口,因此我们既可以使用提供的默认接口配置,也可以自己重写userDetailService方法。
方式一、
	@Override
    protected void configure(AuthenticationManagerBuilder auth) throws Exception{
        //基于内存配置测试用户
        auth.inMemoryAuthentication()
                .withUser("admin")
                .password("123456")
                .roles("admin")
                .and()
                .withUser("badcat")
                .password("123456")
                .roles("user");
    }
方式二、
	@Override
    @Bean
    protected UserDetailsService userDetailsService() {
        InMemoryUserDetailsManager manager = new InMemoryUserDetailsManager();
        manager.createUser(User.withUsername("admin")
                           .password("123456").roles("admin").build());
        manager.createUser(User.withUsername("badcat")
                           .password("123456").roles("user").build());
        return manager;
    }
重写configure(WebSecurity web),忽略一些不用检验的静态资源
@Override
public void configure(WebSecurity web) throws Exception {
    web.ignoring().antMatchers("/js/**", "/css/**","/images/**");
}
重写configure(HttpSecurity http),
@Override
protected void configure(HttpSecurity http) throws Exception {
    http.authorizeRequests()//通过authorizeRequests()方法来开始请求权限配置。
            .anyRequest().authenticated()//对http所有的请求必须通过授权认证才可以访问
            .and()//表示结束当前标签,上下文回到HttpSecurity,开启新一轮的配置。
            .formLogin()
            .loginPage("/login.html")//使用自己配置的登录页面
            .permitAll()//表示登录相关的页面/接口不要被拦截
            .and()
            .csrf().disable();//关闭csrf,防止跨站请求伪造
}
JSON交互
在前后端分离这样的开发架构下,前后端的交互都是通过 JSON 来进行,无论登录成功还是失败,都不会有什么服务端跳转或者客户端跳转之类。
登陆成功
登录成功的处理是通过successHandler(AuthenticationSuccessHandler successHandler),AuthenticationSuccessHandler 这个对象中我们要实现的方法是 onAuthenticationSuccess,有三个参数。
.successHandler((req, resp, authentication) -> {
    //req:相当与HttpServletRequest,可用来服务器跳转或返回JSON
    //resp:相当与HttpServletRespose,可用来客户端跳转或返回JSON
    //authentication:保存了我们登录后的用户信息
    Object principal = authentication.getPrincipal();
    resp.setContentType("application/json;charset=utf-8");//设置内容类型
    PrintWriter out = resp.getWriter();
    out.write(new ObjectMapper().writeValueAsString(principal));//打印登录信息
    out.flush();
    out.close();
})
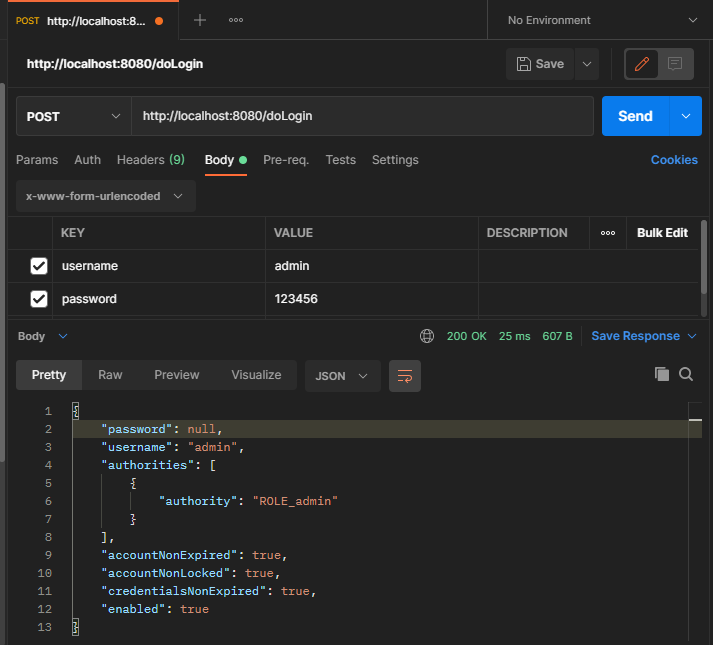
在postman中测试登录效果如图所示
登录失败
登录失败的回调方法failureHandler类似
.failureHandler((req, resp, e) -> {
    //e 保存了登录失败的原因
    resp.setContentType("application/json;charset=utf-8");
    PrintWriter out = resp.getWriter();
    out.write(e.getMessage());
    out.flush();
    out.close();
})
   .permitAll()
   .and()
这里有一个以前没有注意的地方,就是在用户名或者密码输入错误的时候,一般系统给出的提示是比较模糊的“用户名或者密码输入错误”,因为过于明确的错误提示会给系统带来风险。Spring Security安全框架为了避免这种风险也有对策,用户名查找失败对应的异常是UsernameNotFoundException,密码匹配失败对应的异常是BadCredentialsException,但还有一个hideUserNotFoundExceptions 默认的值为 true,也就是会隐藏用户名匹配失败的异常,无论用户还是密码写错,收到的都是 BadCredentialsException 异常。
未认证
未认证情况下,一般重定向到登录页面。但是在前后端分离的情况下,不应该直接重定向到登录页面,而是给用户一个尚未登录的提示,前端收到提示后,再自己去决定跳转到哪个页面。
.csrf().disable().exceptionHandling()
.authenticationEntryPoint((req, resp, authException) -> {
            resp.setContentType("application/json;charset=utf-8");
            PrintWriter out = resp.getWriter();
            out.write("尚未登录,请先登录");
            out.flush();
            out.close();
        }
);
注销登录
注销也是类似的处理
                .logout()
                .logoutUrl("/logout")
                .logoutSuccessHandler((req, resp, authentication) -> {
                    resp.setContentType("application/json;charset=utf-8");
                    PrintWriter out = resp.getWriter();
                    out.write("注销成功");
                    out.flush();
                    out.close();
                })
                .permitAll()
                .and()
授权操作
一个系统往往存在多种不同类型的用户角色,以最简单的为例,分为管理员和普通用户,二者登录系统后所拥有的权限必然是不同的,像普通用户肯定不能够访问到后台管理页面,这样才是合理的设计。
首先准备几个接口。
@RestController
public class HelloController {

    @GetMapping("/hello")
    public String hello(){
        return "hello";
    }

    @GetMapping("/admin/hello")
    public String admin(){
        return "admin";
    }

    @GetMapping("/user/hello")
    public String user(){
        return "user";
    }
}
配置权限的拦截规则在configure(HttpSecurity http)中
http.authorizeRequests()
                .antMatchers("/admin/**").hasRole("admin")
                .antMatchers("/user/**").hasRole("user")
                .anyRequest().authenticated()
                .and()
    			....
    			....
按照请求路径做了简单的区分拦截,最重要的是拦截规则的顺序不能写错,因为匹配的时候是从上往下,一旦匹配到就不再继续向下匹配了。而且显而易见,从语义上理解,anyRequest 应该放在最后,表示除了前面拦截规则之外,剩下的请求要如何处理。
角色继承
因为管理员应当也具备普通用户的权限,也就是上级具备下级的所有权限,这里使用角色继承。继续在SecurityConfig中配置继承关系。
    @Bean
    RoleHierarchy roleHierarchy(){
        RoleHierarchyImpl hierarchy = new RoleHierarchyImpl();
        hierarchy.setHierarchy("ROLE_admin > ROLE_user");
        return hierarchy;
    }
配置完成后分别登陆两种角色测试,user无法访问到/admin/hello接口,而admin可以访问所有接口。
用户数据存入数据库
如果没有设置自动更新,加入新依赖后记得及时reimport maven
首先添加数据库依赖。
<dependency>
    <groupId>org.springframework.boot</groupId>
    <artifactId>spring-boot-starter-jdbc</artifactId>
</dependency>
<dependency>
    <groupId>mysql</groupId>
    <artifactId>mysql-connector-java</artifactId>
</dependency>
在application.properties或application.yml中配置数据库连接,个人感觉yml的层次结构看着更清晰
spring:
  datasource:
    url: jdbc:mysql://localhost:3306/blog?characterEncoding=utf-8&useSSL=false
    username: root
    password: root
    driver-class-name: com.mysql.jdbc.Driver
JdbcUserDetailsManager 提供了一个数据库模型,可以在External Libraries找到
org/springframework/security/core/userdetails/jdbc/users.ddl
将其中的varchar_ignorecase类型改成varchar即符合mysql规范,然后执行这个脚本创建数据表。
之前直接用的InMemoryUserDetailsManager,现在用JdbcUserDetailsManager代替它来提供用户数据。
    @Autowired
    DataSource dataSource;

    @Override
    @Bean
    protected UserDetailsService userDetailsService() {
        JdbcUserDetailsManager manager = new JdbcUserDetailsManager(dataSource);
        if(!manager.userExists("admin")){//防止重复添加
            manager.createUser(User.withUsername("admin")
                               .password("123456").roles("admin").build());
        }
        if(!manager.userExists("badcat")){
            manager.createUser(User.withUsername("badcat")
                               .password("123456").roles("user").build());
        }
        return manager;
    }
一开始dataSource报红,提示没有找到对应的bean,后来发现是因为引入数据库依赖后没有自动reimport,刷新maven后即可。
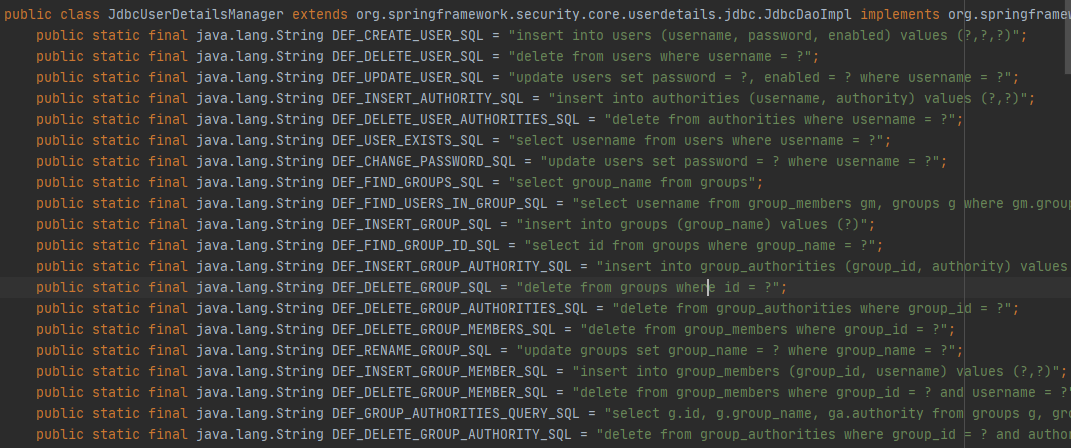
这里的userExists和createUser实际都是通过预定义好的sql实现的,可以在源码里看到。
配置完成后启动项目,数据表中就自动添加了两个用户,并且配置好了角色。再分别用两个身份登录测试权限,没有什么问题。
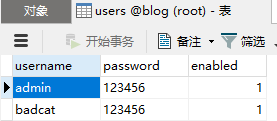
用户表里有个字段enabled,如果设置为false/0,就表示禁用该账户,无法再登录。