n1cef1sh's Blog
练习代码同步到github:SpringSecuritySamples/verify_code
自定义认证逻辑——以验证码为例
SpringSecurity框架的核心机制就是过滤器链,具体原理暂且不研究,只知大概和使用方法。
这次要在之前登录功能的基础上,添加比较常见的登录验证码功能,设计思路如下
登录请求是调用 AbstractUserDetailsAuthenticationProvider#authenticate 方法进行认证的,在该方法中,又会调用到 DaoAuthenticationProvider#additionalAuthenticationChecks 方法做进一步的校验,去校验用户登录密码。我们可以自定义一个 AuthenticationProvider 代替 DaoAuthenticationProvider,并重写它里边的 additionalAuthenticationChecks 方法,在重写的过程中,加入验证码的校验逻辑即可。
这样的好处是不会破坏原来的过滤器链,并且完成了想要实现的自定义功能。
首先引入一个现成的验证码库kaptcha。
<dependency>
    <groupId>com.github.penggle</groupId>
    <artifactId>kaptcha</artifactId>
    <version>2.3.2</version>
</dependency>
接着围绕验证码进行一系列设置,首先在SecurityConfig里提供一个验证码的实体类,设置验证码图片的基本属性
    @Bean
    DefaultKaptcha verifyCode() {
        Properties properties = new Properties();
        properties.setProperty("kaptcha.image.width", "150");
        properties.setProperty("kaptcha.image.height", "50");
        properties.setProperty("kaptcha.textproducer.char.string", "0123456789");
        properties.setProperty("kaptcha.textproducer.char.length", "4");
        Config config = new Config(properties);
        DefaultKaptcha defaultKaptcha = new DefaultKaptcha();
        defaultKaptcha.setConfig(config);
        return defaultKaptcha;
    }
编写返回验证码图片的接口
@RestController
public class VerifyCodeController {
    @Autowired
    Producer producer;

    /**
    * @Description: 返回验证码图片的接口
    * @Param: [resp, session]
    * @return: void
    * @Date: 2021/4/2
    */
    @GetMapping("/vc.jpg")
    public void getVerifyCode(HttpServletResponse resp, HttpSession session) throws IOException {
        resp.setContentType("image/jpeg");
        String text = producer.createText();
        session.setAttribute("verify_code", text);
        BufferedImage image = producer.createImage(text);
        try(ServletOutputStream out = resp.getOutputStream()) {
            ImageIO.write(image, "jpg", out);
        }
    }
重点就是自定义一个MyAuthenticationProvider类,重写additionalAuthenticationChecks方法,从而在过滤器链中实现对验证码的验证功能
public class MyAuthenticationProvider extends DaoAuthenticationProvider {

    @Override
    protected void additionalAuthenticationChecks(UserDetails userDetails, UsernamePasswordAuthenticationToken authentication) throws AuthenticationException {
        //获取当前请求
        HttpServletRequest req = ((ServletRequestAttributes) RequestContextHolder.getRequestAttributes()).getRequest();
        //拿到用户传来的验证码
        String code = req.getParameter("code");
        //session中拿到生成的验证码字符串
        String verify_code = (String) req.getSession().getAttribute("verify_code");
        //比较二者
        if (code == null || verify_code == null || !code.equals(verify_code)) {
            throw new AuthenticationServiceException("验证码错误");
        }
        //调用父类的这个方法,其中进行密码的校验
        super.additionalAuthenticationChecks(userDetails, authentication);
    }
}
但是只定义了没有用,所有的 AuthenticationProvider 都是放在 ProviderManager 中统一管理的,需要把自定义的MyAuthenticationProvider注入ProviderManager。
    /**
    * @Description: 提供自定义实例
    * @Param: []
    * @return: com.example.demo.config.MyAuthenticationProvider
    * @Date: 2021/4/2
    */
    @Bean
    MyAuthenticationProvider myAuthenticationProvider() {
        MyAuthenticationProvider myAuthenticationProvider = new MyAuthenticationProvider();
        myAuthenticationProvider.setPasswordEncoder(passwordEncoder());
        myAuthenticationProvider.setUserDetailsService(userDetailsService());
        return myAuthenticationProvider;
    }

    /**
    * @Description: 把自定义的myAuthenticationProvider注入ProviderManager
    * @Param: []
    * @return: org.springframework.security.authentication.AuthenticationManager
    * @Date: 2021/4/2
    */
    @Override
    @Bean
    protected AuthenticationManager authenticationManager() throws Exception {
        ProviderManager manager = new ProviderManager(Arrays.asList(myAuthenticationProvider()));
        return manager;
    }
最后设置/vc.jpg所有人都可以访问,并且设置各种返回信息。
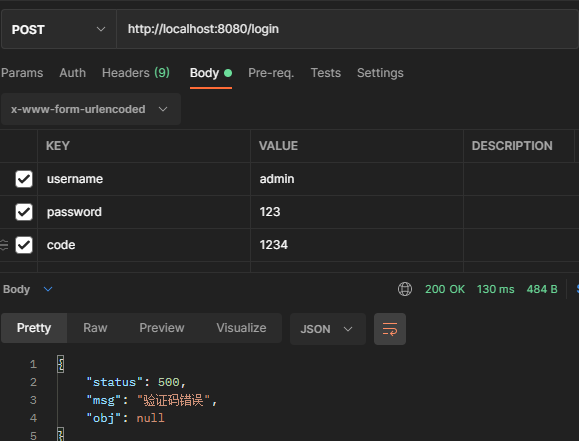
启动项目测试。
随便输一个验证码的话,提示错误
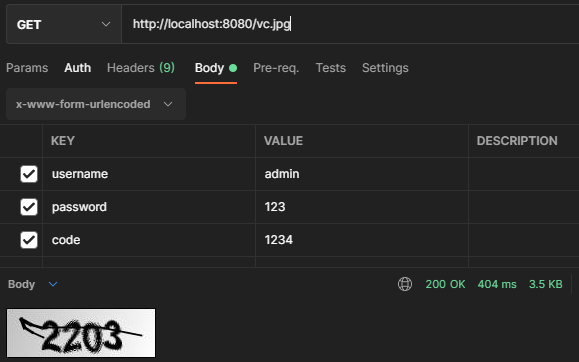
然后get到/vc.jpg查看验证码
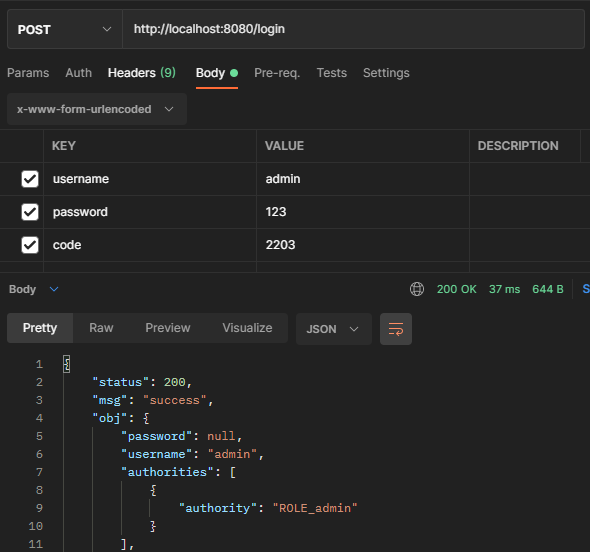
输入正确的验证码登录
2021-11-15更新
关于登录用户详细信息
Authentication 接口用来保存我们的登录用户信息,是对java.security.Principal的进一步封装。这里使用其中的 getDetails接口,查看有关身份认证的其他信息,默认存储的是用户登录的ip和sessionId。
默认的配置是通过 WebAuthenticationDetailsSource 来构建 WebAuthenticationDetails,并将结果设置到 Authentication 的 details 属性中去。为了更方便的使用和拓展,可以自定义WebAuthenticationDetails实现功能。
首先定义一个MyWebAuthenticationDetails继承WebAuthenticationDetails。在这里面对验证码进行判断。
而拓展属性的话也在这里增加,然后从 HttpServletRequest 中提取出来设置给对应的属性即可。此处随便定义了一个test拓展属性用来测试。
    private boolean isPassed;
	//拓展属性,测试用
    private final String test;

    public MyWebAuthenticationDetails(HttpServletRequest req) {
        super(req);
        this.test = req.getParameter("test");
        String code = req.getParameter("code");
        String verify_code = (String) req.getSession().getAttribute("verify_code");

        if (code != null && verify_code != null && code.equals(verify_code)) {
            isPassed = true;
        }
    }

    public boolean isPassed() {
        return isPassed;
    }
    public String getTest(){
        return test;
    }
然后在自定义的MyWebAuthenticationDetailsSource里构造MyWebAuthenticationDetails
@Component
public class MyWebAuthenticationDetailsSource implements AuthenticationDetailsSource<HttpServletRequest,MyWebAuthenticationDetails> {
    @Override
    public MyWebAuthenticationDetails buildDetails(HttpServletRequest httpServletRequest) {
        return new MyWebAuthenticationDetails(httpServletRequest);
    }
}
定义好之后,就可以在之前的MyAuthenticationProvider里进行调用判断了。
public class MyAuthenticationProvider extends DaoAuthenticationProvider {

    @Override
    protected void additionalAuthenticationChecks(UserDetails userDetails, UsernamePasswordAuthenticationToken authentication) throws AuthenticationException {
        if (!((MyWebAuthenticationDetails) authentication.getDetails()).isPassed()) {
            throw new AuthenticationServiceException("验证码错误");
        }
        super.additionalAuthenticationChecks(userDetails, authentication);
    }
}
最后就是修改配置类,用自定义的MyWebAuthenticationDetailsSource 代替系统默认的WebAuthenticationDetailsSource。
@Autowired
MyWebAuthenticationDetailsSource myWebAuthenticationDetailsSource;
@Override
protected void configure(HttpSecurity http) throws Exception {
    http.authorizeRequests()
            ...
            .and()
            .formLogin()
        	//新增了这行,配置了注入的myWebAuthenticationDetailsSource
            .authenticationDetailsSource(myWebAuthenticationDetailsSource)
            ...
}
完成配置后,在service里去获取detail。之所以在service里操作,就是为了体现随时随地的特点。
@Service
public class HelloService {
    public void hello() {
        Authentication authentication = SecurityContextHolder.getContext().getAuthentication();
        MyWebAuthenticationDetails details = (MyWebAuthenticationDetails) authentication.getDetails();
        System.out.println(details);
    }
}
最后在controller的接口里调用service,访问接口,查看控制台输入,打印了登录用户的ip和sessionid,但是没有打印出自己新加的拓展属性。

看了一下WebAuthenticationDetails的源码,问题出在这里。有一个默认的toString方法。
    public String toString() {
        StringBuilder sb = new StringBuilder();
        sb.append(this.getClass().getSimpleName()).append(" [");
        sb.append("RemoteIpAddress=").append(this.getRemoteAddress()).append(", ");
        sb.append("SessionId=").append(this.getSessionId()).append("]");
        return sb.toString();
    }
所以只要在MyWebAuthenticationDetails里重写一下这个方法,把test加上就行了。
    @Override
    public String toString() {
        StringBuilder sb = new StringBuilder();
        sb.append(this.getClass().getSimpleName()).append(" [");
        sb.append("RemoteIpAddress=").append(this.getRemoteAddress()).append(", ");
        sb.append("SessionId=").append(this.getSessionId()).append(", ");
        sb.append("Test=").append(this.getTest()).append("]");
        return sb.toString();
    }
再访问接口,查看控制台输出就可以了。
